Development environment
In this chapter we'll set up your environment for developing Vulkan applications and install some useful libraries. All of the tools we'll use, with the exception of the compiler, are compatible with Windows, Linux and MacOS, but the steps for installing them differ a bit, which is why they're described separately here.
Windows
If you're developing for Windows, then I will assume that you are using Visual Studio to compile your code. For complete C++17 support, you need to use either Visual Studio 2017 or 2019. The steps outlined below were written for VS 2017.
Vulkan SDK
The most important component you'll need for developing Vulkan applications is the SDK. It includes the headers, standard validation layers, debugging tools and a loader for the Vulkan functions. The loader looks up the functions in the driver at runtime, similarly to GLEW for OpenGL - if you're familiar with that.
The SDK can be downloaded from the LunarG website using the buttons at the bottom of the page. You don't have to create an account, but it will give you access to some additional documentation that may be useful to you.
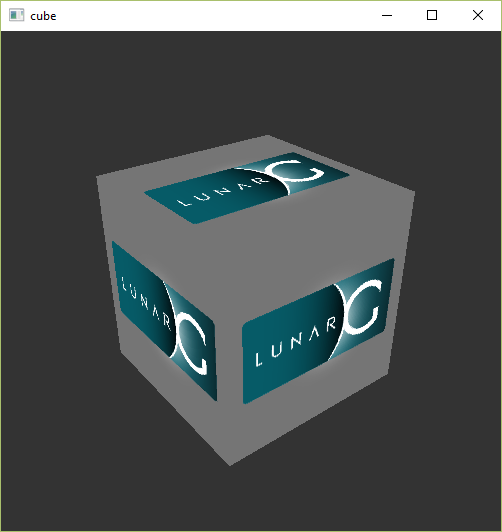
Proceed through the installation and pay attention to the install location of
the SDK. The first thing we'll do is verify that your graphics card and driver
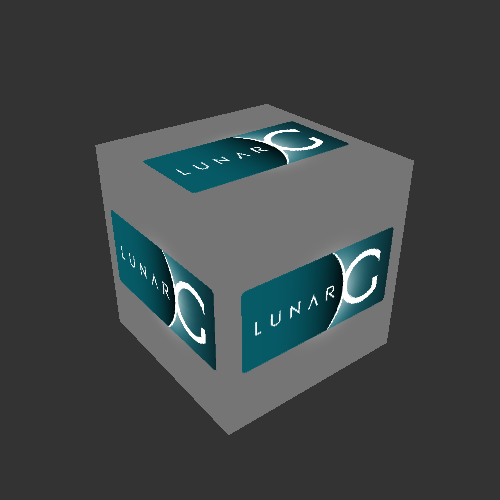
properly support Vulkan. Go to the directory where you installed the SDK, open
the Bin directory and run the vkcube.exe demo. You should see the following:
If you receive an error message then ensure that your drivers are up-to-date, include the Vulkan runtime and that your graphics card is supported. See the introduction chapter for links to drivers from the major vendors.
There is another program in this directory that will be useful for development. The glslangValidator.exe and glslc.exe programs will be used to compile shaders from the
human-readable GLSL to
bytecode. We'll cover this in depth in the shader modules
chapter. The Bin directory also contains the binaries of the Vulkan loader
and the validation layers, while the Lib directory contains the libraries.
Lastly, there's the Include directory that contains the Vulkan headers. Feel free to explore the other files, but we won't need them for this tutorial.
GLFW
As mentioned before, Vulkan by itself is a platform agnostic API and does not include tools for creating a window to display the rendered results. To benefit from the cross-platform advantages of Vulkan and to avoid the horrors of Win32, we'll use the GLFW library to create a window, which supports Windows, Linux and MacOS. There are other libraries available for this purpose, like SDL, but the advantage of GLFW is that it also abstracts away some of the other platform-specific things in Vulkan besides just window creation.
You can find the latest release of GLFW on the official website.
In this tutorial we'll be using the 64-bit binaries, but you can of course also
choose to build in 32 bit mode. In that case make sure to link with the Vulkan
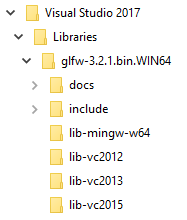
SDK binaries in the Lib32 directory instead of Lib. After downloading it, extract the archive
to a convenient location. I've chosen to create a Libraries directory in the
Visual Studio directory under documents.
GLM
Unlike DirectX 12, Vulkan does not include a library for linear algebra operations, so we'll have to download one. GLM is a nice library that is designed for use with graphics APIs and is also commonly used with OpenGL.
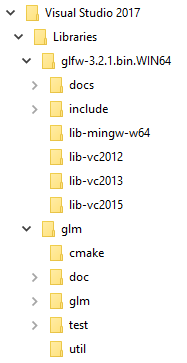
GLM is a header-only library, so just download the latest version and store it in a convenient location. You should have a directory structure similar to the following now:
Setting up Visual Studio
Now that you've installed all of the dependencies we can set up a basic Visual Studio project for Vulkan and write a little bit of code to make sure that everything works.
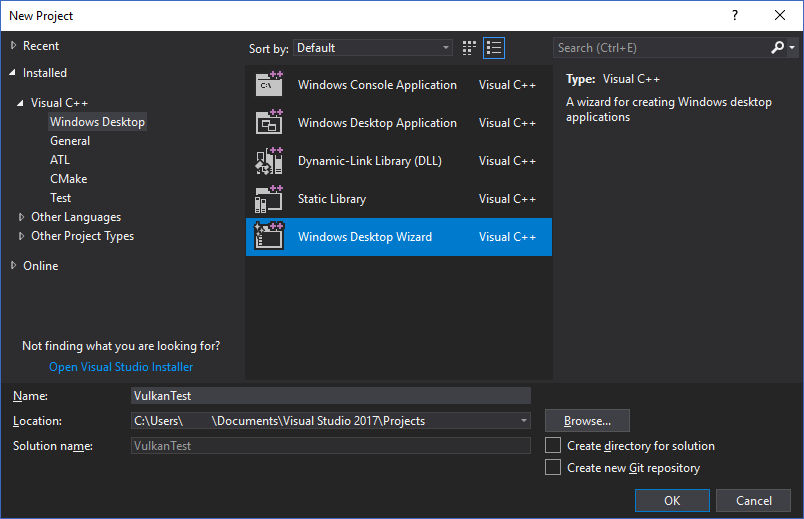
Start Visual Studio and create a new Windows Desktop Wizard project by entering a name and pressing OK.
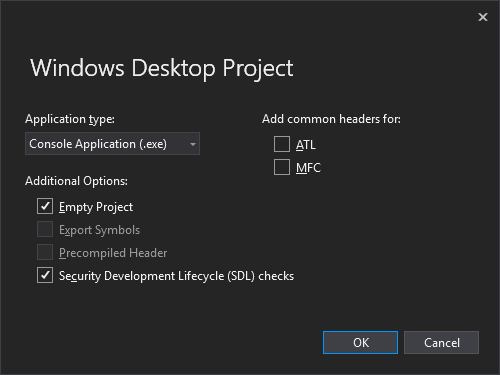
Make sure that Console Application (.exe) is selected as application type so that we have a place to print debug messages to, and check Empty Project to prevent Visual Studio from adding boilerplate code.
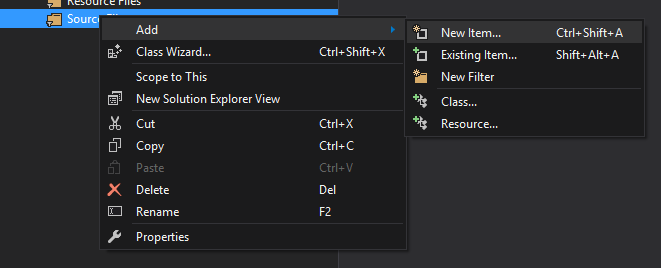
Press OK to create the project and add a C++ source file. You should
already know how to do that, but the steps are included here for completeness.

Now add the following code to the file. Don't worry about trying to understand it right now; we're just making sure that you can compile and run Vulkan applications. We'll start from scratch in the next chapter.
#define GLFW_INCLUDE_VULKAN
#include <GLFW/glfw3.h>

#define GLM_FORCE_RADIANS
#define GLM_FORCE_DEPTH_ZERO_TO_ONE
#include <glm/vec4.hpp>
#include <glm/mat4x4.hpp>

#include <iostream>

int main() {
    glfwInit();

    glfwWindowHint(GLFW_CLIENT_API, GLFW_NO_API);
    GLFWwindow* window = glfwCreateWindow(800, 600, "Vulkan window", nullptr, nullptr);

    uint32_t extensionCount = 0;
    vkEnumerateInstanceExtensionProperties(nullptr, &extensionCount, nullptr);

    std::cout << extensionCount << " extensions supported\n";

    glm::mat4 matrix;
    glm::vec4 vec;
    auto test = matrix * vec;

    while(!glfwWindowShouldClose(window)) {
        glfwPollEvents();
    }

    glfwDestroyWindow(window);

    glfwTerminate();

    return 0;
}
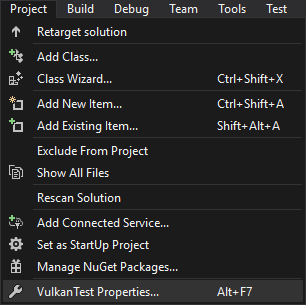
Let's now configure the project to get rid of the errors. Open the project
properties dialog and ensure that All Configurations is selected, because most
of the settings apply to both Debug and Release mode.

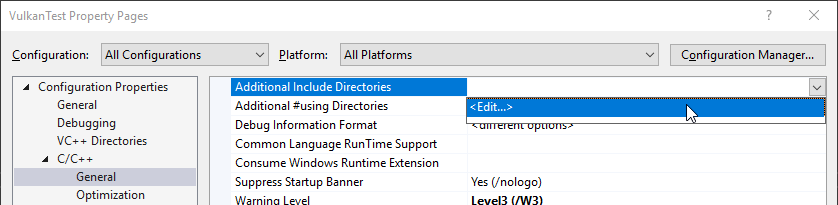
Go to C++ -> General -> Additional Include Directories and press <Edit...>
in the dropdown box.
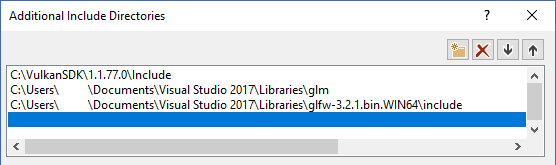
Add the header directories for Vulkan, GLFW and GLM:
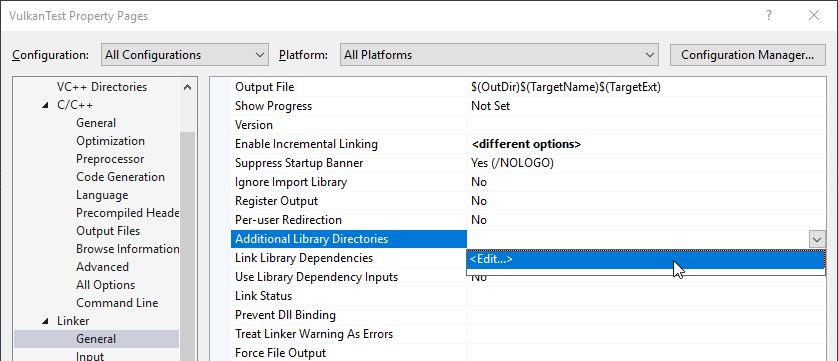
Next, open the editor for library directories under Linker -> General:
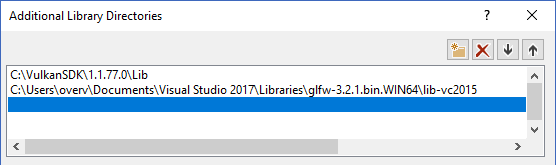
And add the locations of the object files for Vulkan and GLFW:
Go to Linker -> Input and press <Edit...> in the Additional Dependencies
dropdown box.
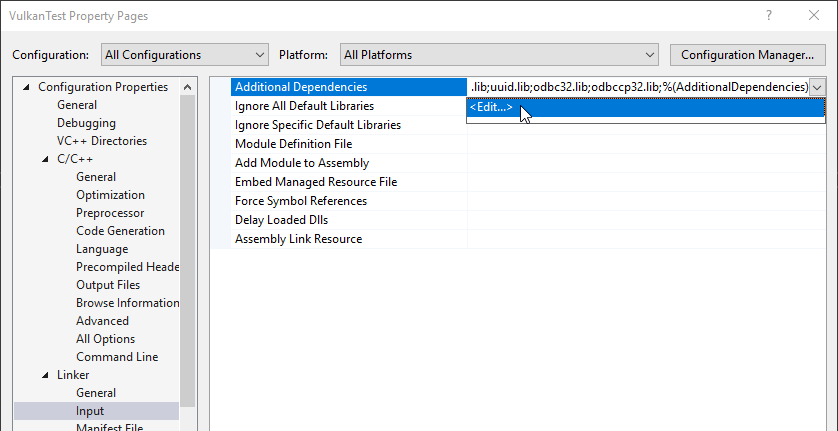
Enter the names of the Vulkan and GLFW object files:

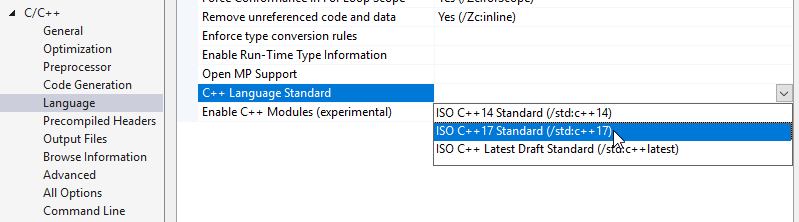
And finally change the compiler to support C++17 features:
You can now close the project properties dialog. If you did everything right then you should no longer see any more errors being highlighted in the code.
Finally, ensure that you are actually compiling in 64 bit mode:

Press F5 to compile and run the project and you should see a command prompt
and a window pop up like this:

The number of extensions should be non-zero. Congratulations, you're all set for playing with Vulkan!
Linux
These instructions will be aimed at Ubuntu, Fedora and Arch Linux users, but you may be able to follow
along by changing the package manager-specific commands to the ones that are appropriate for you. You should have a compiler that supports C++17 (GCC 7+ or Clang 5+). You'll also need make.
Vulkan Packages
The most important components you'll need for developing Vulkan applications on Linux are the Vulkan loader, validation layers, and a couple of command-line utilities to test whether your machine is Vulkan-capable:
-
sudo apt install vulkan-toolsorsudo dnf install vulkan-tools: Command-line utilities, most importantlyvulkaninfoandvkcube. Run these to confirm your machine supports Vulkan. -
sudo apt install libvulkan-devorsudo dnf install vulkan-loader-devel: Installs Vulkan loader. The loader looks up the functions in the driver at runtime, similarly to GLEW for OpenGL - if you're familiar with that. -
sudo apt install vulkan-validationlayers spirv-toolsorsudo dnf install mesa-vulkan-drivers vulkan-validation-layers-devel: Installs the standard validation layers and required SPIR-V tools. These are crucial when debugging Vulkan applications, and we'll discuss them in the upcoming chapter.
On Arch Linux, you can run sudo pacman -S vulkan-devel to install all the
required tools above.
If installation was successful, you should be all set with the Vulkan portion. Remember to run
vkcube and ensure you see the following pop up in a window:
If you receive an error message then ensure that your drivers are up-to-date, include the Vulkan runtime and that your graphics card is supported. See the introduction chapter for links to drivers from the major vendors.
X Window System and XFree86-VidModeExtension
It is possible that these libraries are not on the system, if not, you can install them using the following commands:
-
sudo apt install libxxf86vm-devordnf install libXxf86vm-devel: Provides an interface to the XFree86-VidModeExtension. -
sudo apt install libxi-devordnf install libXi-devel: Provides an X Window System client interface to the XINPUT extension.
GLFW
As mentioned before, Vulkan by itself is a platform agnostic API and does not include tools for creation a window to display the rendered results. To benefit from the cross-platform advantages of Vulkan and to avoid the horrors of X11, we'll use the GLFW library to create a window, which supports Windows, Linux and MacOS. There are other libraries available for this purpose, like SDL, but the advantage of GLFW is that it also abstracts away some of the other platform-specific things in Vulkan besides just window creation.
We'll be installing GLFW from the following command:
sudo apt install libglfw3-dev
or
sudo dnf install glfw-devel
or
sudo pacman -S glfw
GLM
Unlike DirectX 12, Vulkan does not include a library for linear algebra operations, so we'll have to download one. GLM is a nice library that is designed for use with graphics APIs and is also commonly used with OpenGL.
It is a header-only library that can be installed from the libglm-dev or
glm-devel package:
sudo apt install libglm-dev
or
sudo dnf install glm-devel
or
sudo pacman -S glm
Shader Compiler
We have just about all we need, except we'll want a program to compile shaders from the human-readable GLSL to bytecode.
Two popular shader compilers are Khronos Group's glslangValidator and Google's glslc. The latter has a familiar GCC- and Clang-like usage, so we'll go with that: on Ubuntu, download Google's unofficial binaries and copy glslc to your /usr/local/bin. Note you may need to sudo depending on your permissions. On Fedora use sudo dnf install glslc, while on Arch Linux run sudo pacman -S shaderc. To test, run glslc and it should rightfully complain we didn't pass any shaders to compile:
glslc: error: no input files
We'll cover glslc in depth in the shader modules chapter.
Setting up a makefile project
Now that you have installed all of the dependencies, we can set up a basic makefile project for Vulkan and write a little bit of code to make sure that everything works.
Create a new directory at a convenient location with a name like VulkanTest.
Create a source file called main.cpp and insert the following code. Don't
worry about trying to understand it right now; we're just making sure that you
can compile and run Vulkan applications. We'll start from scratch in the next
chapter.
#define GLFW_INCLUDE_VULKAN
#include <GLFW/glfw3.h>

#define GLM_FORCE_RADIANS
#define GLM_FORCE_DEPTH_ZERO_TO_ONE
#include <glm/vec4.hpp>
#include <glm/mat4x4.hpp>

#include <iostream>

int main() {
    glfwInit();

    glfwWindowHint(GLFW_CLIENT_API, GLFW_NO_API);
    GLFWwindow* window = glfwCreateWindow(800, 600, "Vulkan window", nullptr, nullptr);

    uint32_t extensionCount = 0;
    vkEnumerateInstanceExtensionProperties(nullptr, &extensionCount, nullptr);

    std::cout << extensionCount << " extensions supported\n";

    glm::mat4 matrix;
    glm::vec4 vec;
    auto test = matrix * vec;

    while(!glfwWindowShouldClose(window)) {
        glfwPollEvents();
    }

    glfwDestroyWindow(window);

    glfwTerminate();

    return 0;
}
Next, we'll write a makefile to compile and run this basic Vulkan code. Create a
new empty file called Makefile. I will assume that you already have some basic
experience with makefiles, like how variables and rules work. If not, you can
get up to speed very quickly with this tutorial.
We'll first define a couple of variables to simplify the remainder of the file.
Define a CFLAGS variable that will specify the basic compiler flags:
CFLAGS = -std=c++17 -O2
We're going to use modern C++ (-std=c++17), and we'll set optimization level to O2. We can remove -O2 to compile programs faster, but we should remember to place it back for release builds.
Similarly, define the linker flags in a LDFLAGS variable:
LDFLAGS = -lglfw -lvulkan -ldl -lpthread -lX11 -lXxf86vm -lXrandr -lXi
The flag -lglfw is for GLFW, -lvulkan links with the Vulkan function loader and the remaining flags are low-level system libraries that GLFW needs. The remaining flags are dependencies of GLFW itself: the threading and window management.
It is possible that the Xxf86vm and Xi libraries are not yet installed on your system. You can find them in the following packages:
sudo apt install libxxf86vm-dev libxi-dev
or
sudo dnf install libXi-devel libXxf86vm-devel
or
sudo pacman -S libxi libxxf86vm
Specifying the rule to compile VulkanTest is straightforward now. Make sure to
use tabs for indentation instead of spaces.
VulkanTest: main.cpp
	g++ $(CFLAGS) -o VulkanTest main.cpp $(LDFLAGS)
Verify that this rule works by saving the makefile and running make in the
directory with main.cpp and Makefile. This should result in a VulkanTest
executable.
We'll now define two more rules, test and clean, where the former will
run the executable and the latter will remove a built executable:
.PHONY: test clean

test: VulkanTest
	./VulkanTest

clean:
	rm -f VulkanTest
Running make test should show the program running successfully, and displaying the number of Vulkan extensions. The application should exit with the success return code (0) when you close the empty window. You should now have a complete makefile that resembles the following:
CFLAGS = -std=c++17 -O2
LDFLAGS = -lglfw -lvulkan -ldl -lpthread -lX11 -lXxf86vm -lXrandr -lXi

VulkanTest: main.cpp
	g++ $(CFLAGS) -o VulkanTest main.cpp $(LDFLAGS)

.PHONY: test clean

test: VulkanTest
	./VulkanTest

clean:
	rm -f VulkanTest
You can now use this directory as a template for your Vulkan projects. Make a copy, rename it to something like HelloTriangle and remove all of the code in main.cpp.
You are now all set for the real adventure.
MacOS
These instructions will assume you are using Xcode and the Homebrew package manager. Also, keep in mind that you will need at least MacOS version 10.11, and your device needs to support the Metal API.
Vulkan SDK
The most important component you'll need for developing Vulkan applications is the SDK. It includes the headers, standard validation layers, debugging tools and a loader for the Vulkan functions. The loader looks up the functions in the driver at runtime, similarly to GLEW for OpenGL - if you're familiar with that.
The SDK can be downloaded from the LunarG website using the buttons at the bottom of the page. You don't have to create an account, but it will give you access to some additional documentation that may be useful to you.
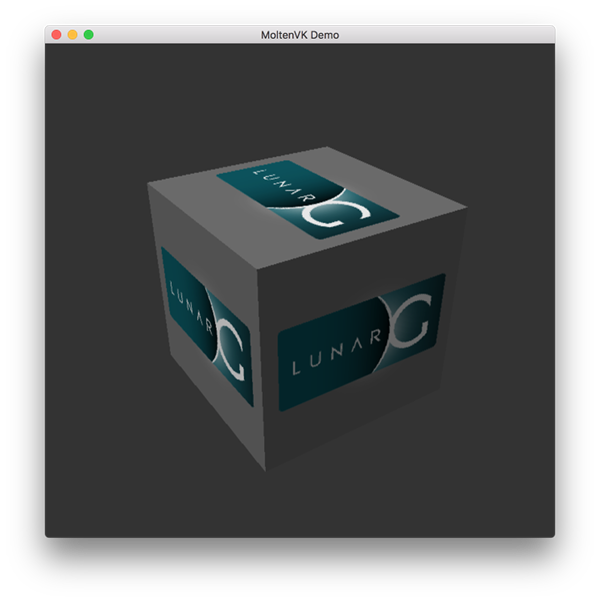
The SDK version for MacOS internally uses MoltenVK. There is no native support for Vulkan on MacOS, so what MoltenVK does is actually act as a layer that translates Vulkan API calls to Apple's Metal graphics framework. With this you can take advantage of debugging and performance benefits of Apple's Metal framework.
After downloading it, simply extract the contents to a folder of your choice (keep in mind you will need to reference it when creating your projects on Xcode). Inside the extracted folder, in the Applications folder you should have some executable files that will run a few demos using the SDK. Run the vkcube executable and you will see the following:
GLFW
As mentioned before, Vulkan by itself is a platform agnostic API and does not include tools for creation a window to display the rendered results. We'll use the GLFW library to create a window, which supports Windows, Linux and MacOS. There are other libraries available for this purpose, like SDL, but the advantage of GLFW is that it also abstracts away some of the other platform-specific things in Vulkan besides just window creation.
To install GLFW on MacOS we will use the Homebrew package manager to get the glfw package:
brew install glfw
GLM
Vulkan does not include a library for linear algebra operations, so we'll have to download one. GLM is a nice library that is designed for use with graphics APIs and is also commonly used with OpenGL.
It is a header-only library that can be installed from the glm package:
brew install glm
Setting up Xcode
Now that all the dependencies are installed we can set up a basic Xcode project for Vulkan. Most of the instructions here are essentially a lot of "plumbing" so we can get all the dependencies linked to the project. Also, keep in mind that during the following instructions whenever we mention the folder vulkansdk we are refering to the folder where you extracted the Vulkan SDK.
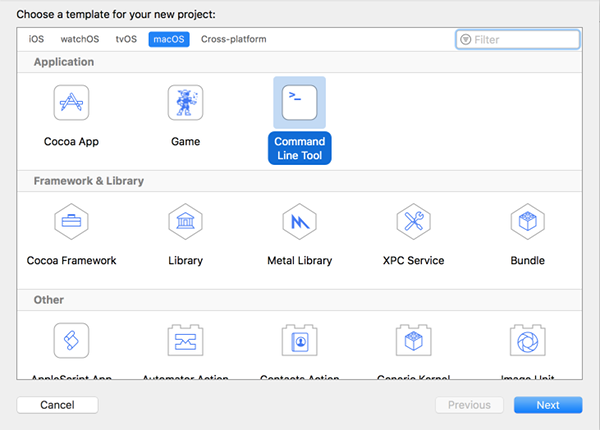
Start Xcode and create a new Xcode project. On the window that will open select Application > Command Line Tool.
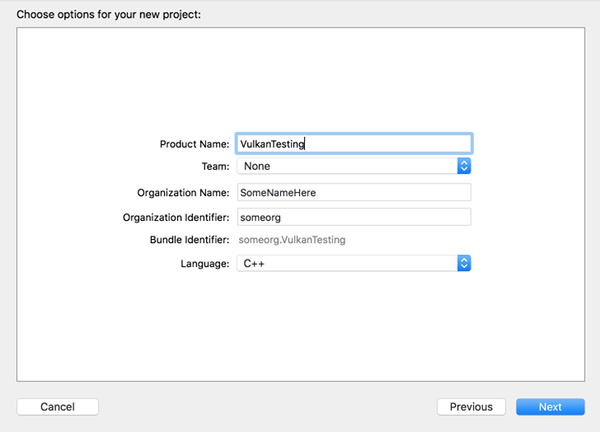
Select Next, write a name for the project and for Language select C++.
Press Next and the project should have been created. Now, let's change the code in the generated main.cpp file to the following code:
#define GLFW_INCLUDE_VULKAN
#include <GLFW/glfw3.h>

#define GLM_FORCE_RADIANS
#define GLM_FORCE_DEPTH_ZERO_TO_ONE
#include <glm/vec4.hpp>
#include <glm/mat4x4.hpp>

#include <iostream>

int main() {
    glfwInit();

    glfwWindowHint(GLFW_CLIENT_API, GLFW_NO_API);
    GLFWwindow* window = glfwCreateWindow(800, 600, "Vulkan window", nullptr, nullptr);

    uint32_t extensionCount = 0;
    vkEnumerateInstanceExtensionProperties(nullptr, &extensionCount, nullptr);

    std::cout << extensionCount << " extensions supported\n";

    glm::mat4 matrix;
    glm::vec4 vec;
    auto test = matrix * vec;

    while(!glfwWindowShouldClose(window)) {
        glfwPollEvents();
    }

    glfwDestroyWindow(window);

    glfwTerminate();

    return 0;
}
Keep in mind you are not required to understand all this code is doing yet, we are just setting up some API calls to make sure everything is working.
Xcode should already be showing some errors such as libraries it cannot find. We will now start configuring the project to get rid of those errors. On the Project Navigator panel select your project. Open the Build Settings tab and then:
- Find the Header Search Paths field and add a link to
/usr/local/include(this is where Homebrew installs headers, so the glm and glfw3 header files should be there) and a link tovulkansdk/macOS/includefor the Vulkan headers. - Find the Library Search Paths field and add a link to
/usr/local/lib(again, this is where Homebrew installs libraries, so the glm and glfw3 lib files should be there) and a link tovulkansdk/macOS/lib.
It should look like so (obviously, paths will be different depending on where you placed on your files):

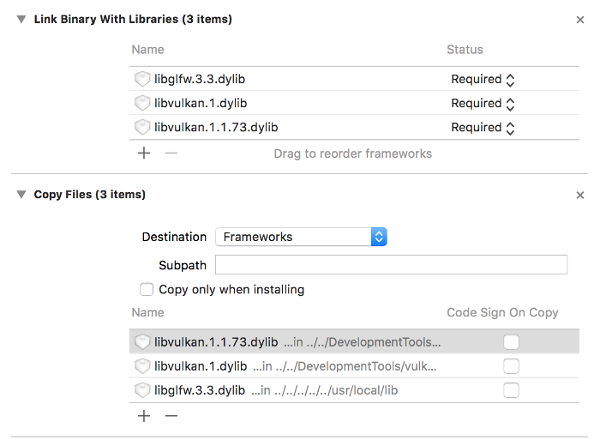
Now, in the Build Phases tab, on Link Binary With Libraries we will add both the glfw3 and the vulkan frameworks. To make things easier we will be adding the dynamic libraries in the project (you can check the documentation of these libraries if you want to use the static frameworks).
- For glfw open the folder
/usr/local/liband there you will find a file name likelibglfw.3.x.dylib("x" is the library's version number, it might be different depending on when you downloaded the package from Homebrew). Simply drag that file to the Linked Frameworks and Libraries tab on Xcode. - For vulkan, go to
vulkansdk/macOS/lib. Do the same for the both fileslibvulkan.1.dylibandlibvulkan.1.x.xx.dylib(where "x" will be the version number of the the SDK you downloaded).
After adding those libraries, in the same tab on Copy Files change Destination to "Frameworks", clear the subpath and deselect "Copy only when installing". Click on the "+" sign and add all those three frameworks here aswell.
Your Xcode configuration should look like:
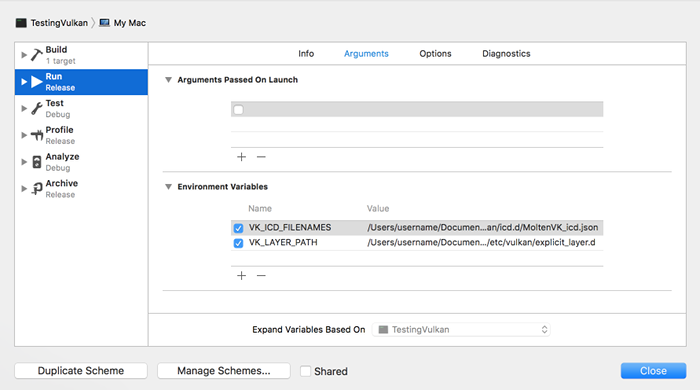
The last thing you need to setup are a couple of environment variables. On Xcode toolbar go to Product > Scheme > Edit Scheme..., and in the Arguments tab add the two following environment variables:
- VK_ICD_FILENAMES =
vulkansdk/macOS/share/vulkan/icd.d/MoltenVK_icd.json - VK_LAYER_PATH =
vulkansdk/macOS/share/vulkan/explicit_layer.d
It should look like so:
Finally, you should be all set! Now if you run the project (remembering to setting the build configuration to Debug or Release depending on the configuration you chose) you should see the following:
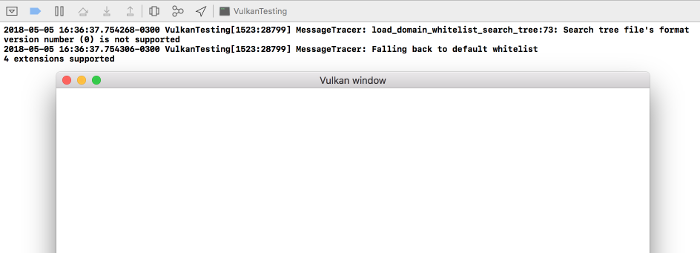
The number of extensions should be non-zero. The other logs are from the libraries, you might get different messages from those depending on your configuration.
You are now all set for the real thing.